I used to have a little glass enamel night light cover, I really loved the stained glass peacock design, but it was broken. For the life of me I can't find anything quite like it, but I did use it as inspiration for the design of these earrings. I'm still bummed that it's broken, but I made these as a thank you gift for someone and they seem to like them, so at least a little something good came out of it.
Showing posts with label Jewelry. Show all posts
Showing posts with label Jewelry. Show all posts
Wednesday, May 30, 2018
Monday, October 30, 2017
Seasonally Appropriate Dead Bird Earrings
I made some dead birds for my mom's birthday, moms love dead birds...right?
Saturday, September 30, 2017
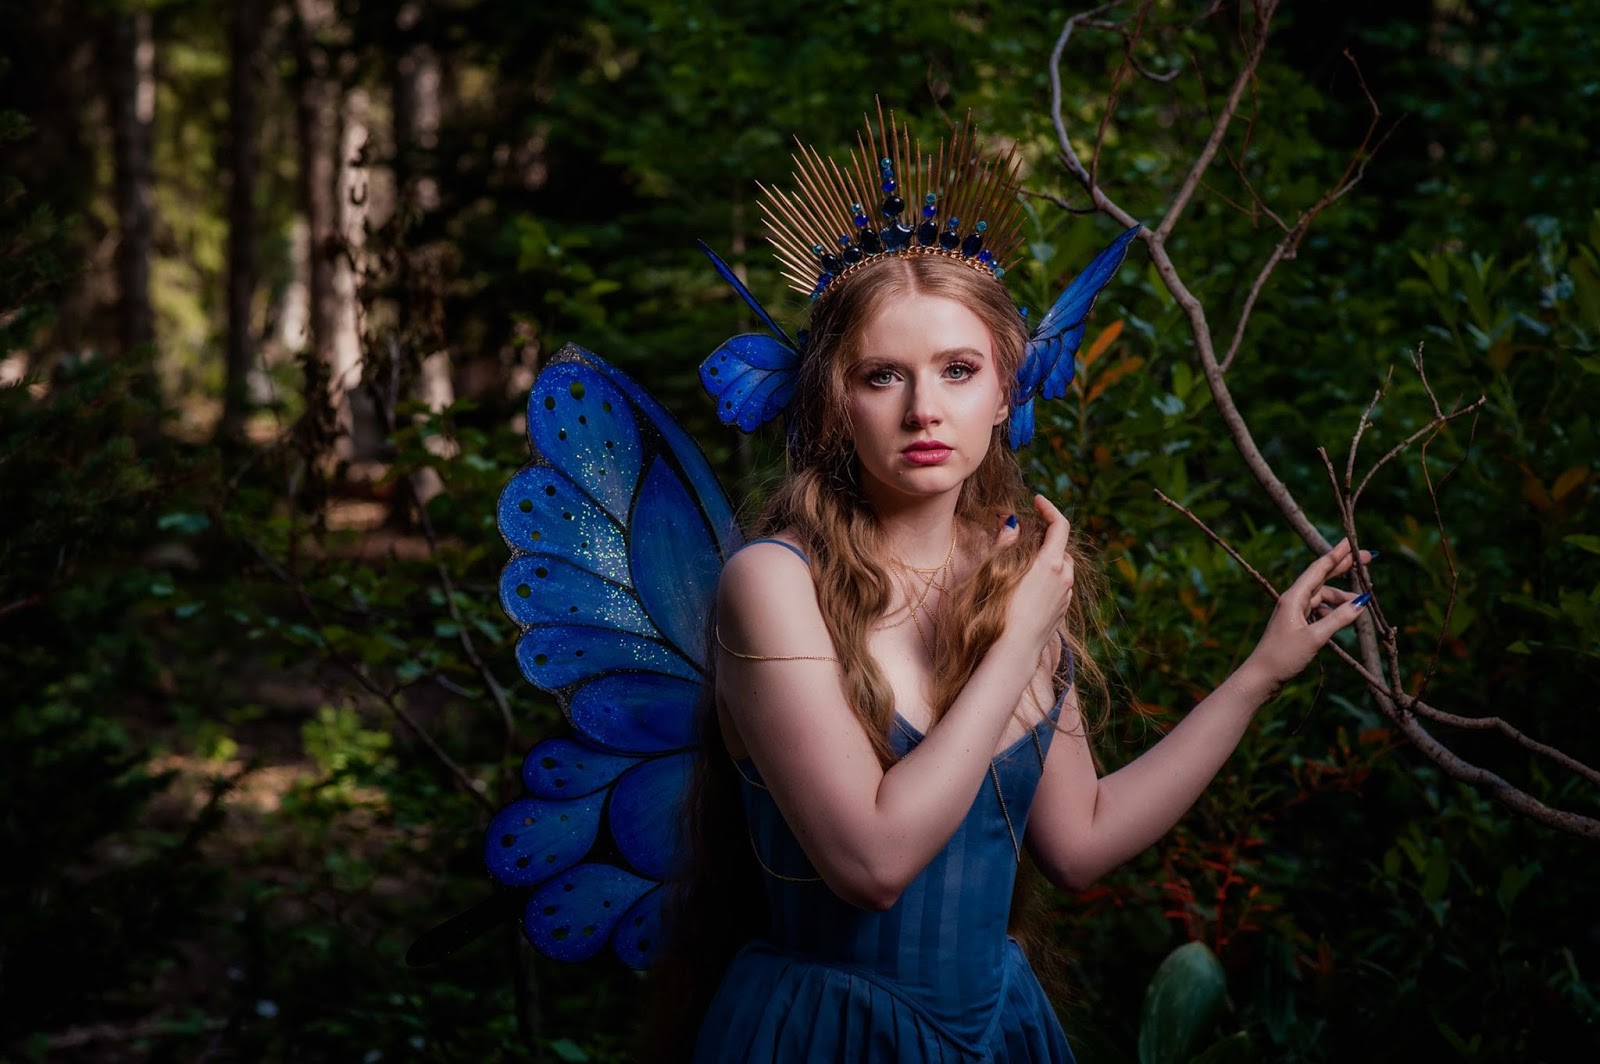
Blue Fairy Photoshoot
Me: You can't upload 25 pictures of yourself in a homemade fairy costume.
Also me: Why not?
Me: Because people don't just do that! It's WEIRD and it comes off in a bad way!
Also me: but I wanna
Me: Don't y-
Also me: I AM A MAJESTIC FAIRY QUEEN AND YOU CAN'T TELL ME WHAT TO DO
Well, the id has spoken. Here are a bunch of photos in semi-alphabetic order by photographer. Thank you so much to everyone involved in this shoot, it was a nerve wracking experience but I'm so glad I didn't chicken out. Please enjoy the pictures, and if you're interested in making any of the pieces from this costume. I have tutorials on how to make the butterfly hair clips, spiked headdress, criss cross body chain, and wings. I also have a video documenting the rather tumultuous process of making the dress, not exactly an informative tutorial, but educational in other ways.
Costume Design/Makeup/Model: Me
Hair: Hailee Simonsen
Shoot Organizer: Tawny Horton
Photographers as follows:
Joann Vivian Mclsaac Meyers


Did I nearly step on my own hair while trying to stand up from this pose? Yes, yes I did.

Mike Christopher

I really went out on a limb for this shot! Dumb puns aside, I was literally standing on a branch bridging a very cold very muddy river. If my foot looks a little tense its because I really didn't want to fall in and get the costume filthy. Muddy perils aside, I think rather tall in this photo, definitely taller than 5'2" so I'm pleased.
Rebecca Dahl


I shot with Rebecca and Steve at the same time and I have to commend them for showing a saintly level of patience with me. From tiptoeing barefoot over pine needles and rocks, to trying to figure out what the heck to do with my arms. They were ceaselessly encouraging, and never made me feel bad for not having a clue what I was doing. Speaking from my limited experience: modeling is hard, and I need all the encouragement I can get.


Robert Fletcher


~fairy flailing~
Steve Berlin


One of the only photos that captured the blue-ness of my highlighter! Fun fact: I totally used this photoshoot as an excuse to go out and get blue duochrome highlighter. Looks blue in person, not so much in most photos and video, still wear it though.


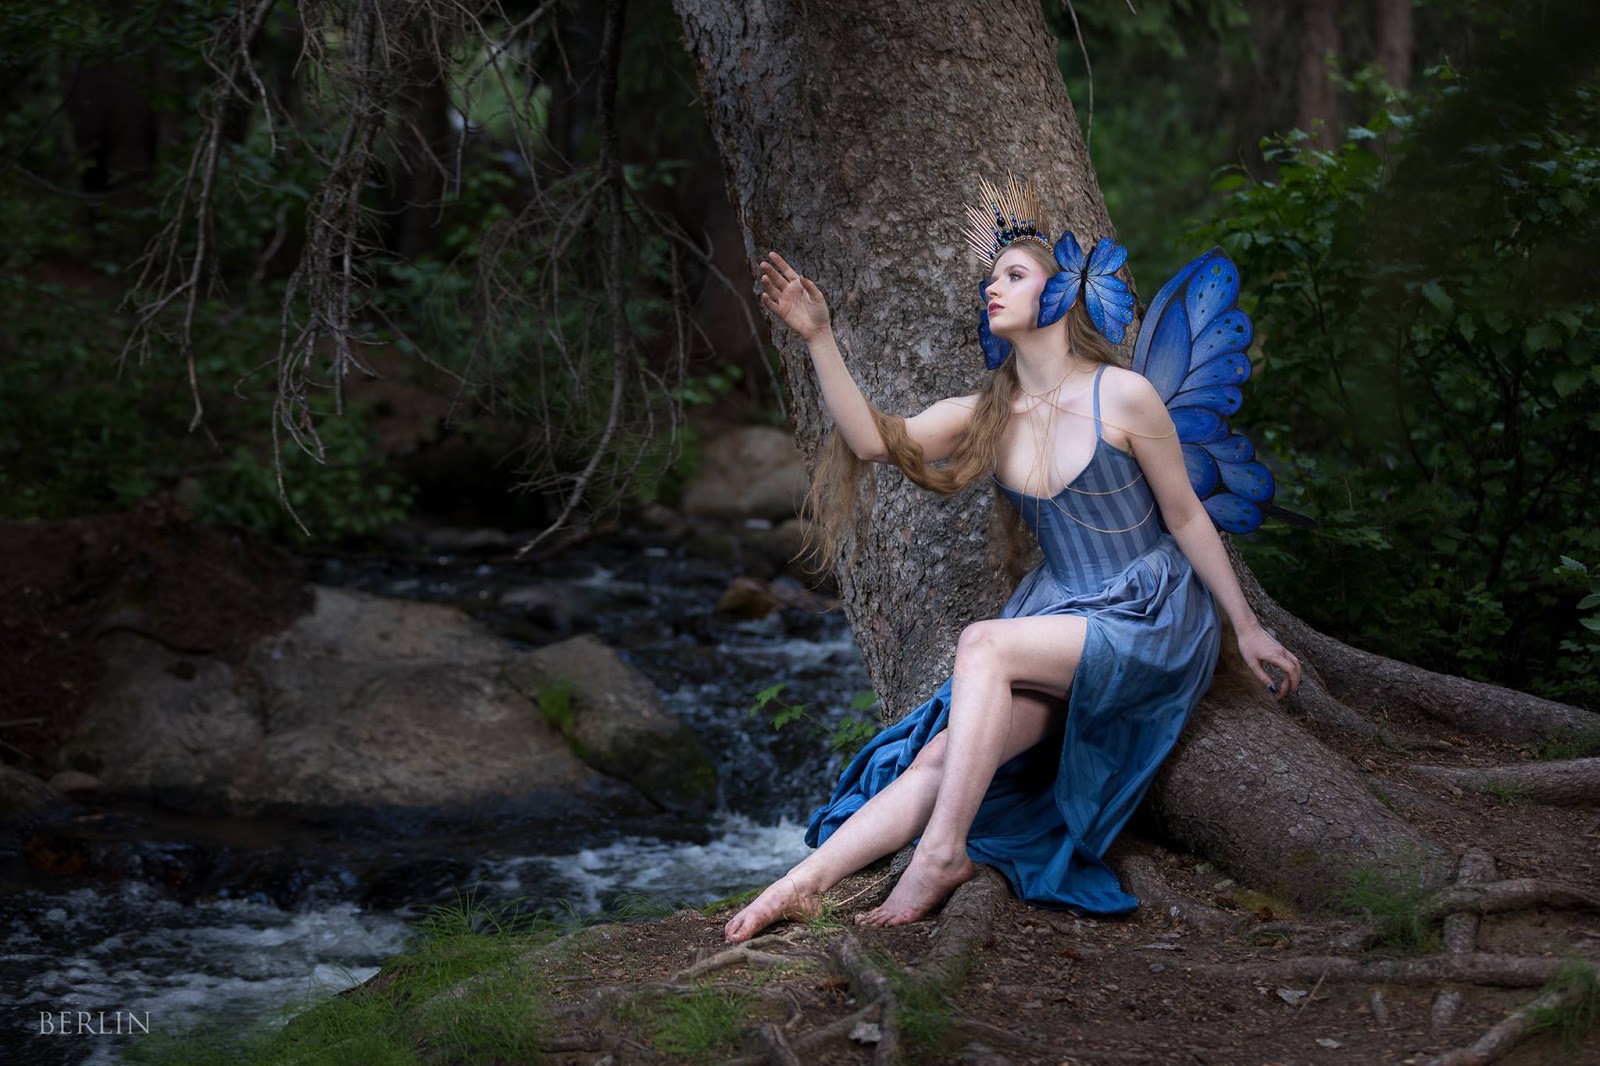
This shot breaks my heart a little. I love so many of the elements, the river in the background, the way the tree's roots overlap and intertwine, the composition and palette, I think my left leg looks pretty good, BUT THOSE GOSH DARN BUTTERFLIES ARE UPSIDE DOWN!!! It drives me a little crazy. The darn things just would not stay in my hair, and because we were shooting in the woods I didn't really have a big mirror to check if I was clipping them back in the right way up. Its one of those things where theres no way of knowing how noticeable it is the another person looking at the photo, but its SUPER noticeable to me.
Val Judy


I love the rich saturated colors in contrast with deep inky shadows in Val's shots, they remind me of a renaissance painting.
Valerie Jones Christiansen


Zhon Johansen

I borrowed a pair of my mothers shoes because I had nothing that matched the rest of the costume, and I wore them for about 17 minutes before throwing them off to go climb on a tree limb. In the end they only ended up in a couple of the shots and I spent the rest of the time running around barefoot in the woods.
Saturday, August 5, 2017
Criss Cross Body Chain
I decided I wanted to try leaving my house (for once...I don't get out a lot) to try and get a slightly more interesting backdrop. There's a parking lot relatively near with all kinds of neat textures, crumbling concrete, plants, fences, etc. Just to try something new, you know? Anywho, I put on my makeup, my outfit, grab my camera, tripod, and head off into the big wide world.
I'm setting up to shoot in a parking lot so I'm extra EXTRA aware of my surroundings, being sure to stay out of the way of any potential incoming or outgoing traffic. I hear a car's engine start, so I move myself and my camera to a place where I know there is no way I could be in the way. So I'm focusing on setting up a new shot, framing things, fiddling with my camera, all that nonsense. I no longer hear the car so I assume whoever was in it is long gone, doing whatever they set out to do. Turns out I was wrong. The guy driving the car apparently started his car, pulled out, saw me, then parked again, and was now walking in my direction...Super, I just love it when random strangers approach me while I'm in the middle of trying to do something.
I notice him, and say "Can I help you?" the most Canadian way of saying "What the hell do you want from me? Please go away." I'm polite, but I make no effort at being friendly or conversational. Apparently this is too subtle. He starts talking at me (not to me, that would imply I'm a willing participant in this conversation), and I do my upmost to make it clear that I'm in the middle of something and even if I did want converse with a complete stranger, now is NOT A GREAT TIME. Again, I guess I was too subtle.
I'm no expert photographer, videographer...whatever, but I do know that good lighting is absolutely key to getting a decent image, and this guy was wasting good daylight.
I get that I'm in a public space. I understand that I'm wearing somewhat over the top makeup and fashion. I'm a random girl with a camera, doing something slightly out of the ordinary. I get why someone might want to come over and investigate the situation. I have nothing against curiosity, but that didn't seem to be this person's driving force. The only curiosity he seemed to have was for my phone number, and seeing as he hadn't made the finest first impression (wasting time & good light) I wasn't super inclined to give it to him. In the end, he wouldn't leave till he gave me his business card.
Overall the interaction was uncomfortable, it left me anxious and annoyed. In the end, I decided to give up on shooting outside, and retreated back home. That negativity stuck with my for a while, and I really wasn't happy with any of the shots I got.
I'm an anxious person. I'm wary of strangers. That said, I don't want to let this interaction reinforce my anxieties, or villainies this random stranger. I simply wish that this stranger had been a bit more observant, aware of the situation, or the signals I was clearly (in my opinion) giving off: I'm busy, you're making me uncomfortable, please just move along. Maybe it's on me, maybe I should be more direct, more assertive, but that doesn't come easily, and honestly, there's a part of me that's scared that any perceived rudeness might will be met with violence.
I just wish things had gone differently.
End of rant, sorry about that.
Monday, June 20, 2016
Penguins for Sonja

For as long as I can remember my grandmother has always loved penguins, she had penguins on her checkbook, calendar, and a painting of them hanging in her hallway. Last Mother's Day when she saw the earrings I made for my mother, she requested I make her a pair as well. Naturally, I thought penguins would be the right design for her.

Instead of repeating the same design on both earrings, I decided to doodle a whole family of penguins. I'm so used to working with a lot of colors (I can't help it, I like rainbows) it was interesting working with a more limited color pallet. Overall, I like them, even if they don't perfectly match, they look like they belong together.

Hopefully, my grandmother likes them too.
Sunday, May 8, 2016
Mother's Day Earrings

My mother is an exceptionally difficult woman to find gifts for, then again I was an exceptionally difficult child to raise (still am). So I suppose stressing over what to buy or make her every time the occasion arises is fair payback (at least for the times I turned my nose up at roast beets and asparagus...ick) Well, its a start.

I decided to make a pair of earrings, and since shrink plastic is quite light I thought it would make an ideal material. I started with purple, one of her favorite colors, and quickly realized I had made a mistake. Instead of tracing my little birdies so that they were mirrored, one tweeting to the left one tweeting to the right...I had just turned the design 180 degrees.

I decided to forge ahead, regardless of my mistake and color the birds in. I tried to keep the color scheme very cool-toned and purple-centric overall, with a pop of yellow here and there for contrast.

Here is how I would have liked my birds to turn out. I love symmetry! However, because shrink plastic has a rough side and a shiny side I couldn't just flip the design over. Well, I suppose I could, but the discrepancy in texture would have bugged the heck outta me.

Have I mentioned how much I love shrinking stuff? :)

I had to find the perfect hardware for my mother’s earrings because she can be remarkably picky: they can't be too heavy, they have to stay in during all manner of activities from skiing to windsurfing, and they cannot under any circumstances be studs. After a bit of searching I found some lightweight silver earring fastenings that latched in the back.

Finished! Fingers crossed she actually likes them.
Friday, January 30, 2015
Shrink Plastic Adventures
Not long ago I was going through some of my craft supplies, attempting to organize them, attempting being a key word here. While I was rummaging through some old beading knick knacks I found some vaguely familiar plastic sheeting, I didn't entirely remember what it was until a month or so later. Shrink plastic! I remembered playing with the stuff years ago, admittedly I got a bit nostalgic...then I remembered why I hadn't touched it in years: drawing...not exactly a forte of mine. Still, I've been a bit burnt out on failed sewing projects, so I thought I'd give it a shot. The results, I'm proud to say where not too appalling.

Not overly appalling, but perhaps a bit tacky :)
The real charm of shrink plastic is, if you make a few mistakes, (as I inevitably do) you can have the satisfaction of watching those mistakes curl up and shrink into obscurity, then pretend they don't exist. It's delightful.
There are a few basic varieties of shrink plastic: clear, white, sanded or smooth. The sanded or frosted shrink plastic is best suited to colored pencils because the texture gives the pencils something to grip onto, and the finished pieces will be matte. The smooth or glossy plastic works best with markers and alcohol inks. The main difference between the clear and white shrink plastic, is that the white plastic is opaque, and the design can only be seen on one side, versus the clear plastic where you can see the design clearly on both sides. You can even achieve a lovely stained glass appearance when working with the clear glossy plastic. (an effect, I can't really demonstrate because I only have the frosted variety)

- Shrink plastic
- Hole punch
- Scissors
- Colored pencils
- Oven
- Baking paper
- Needle nose pliers
- Chain
- Clasp
- (Optional) Clear top coat or glaze

Step 1. Draw whatever you like on the shrink plastic. If drawing isn't your forte you can sketch a few ideas on paper first, or look for images in coloring books and trace the ones you like best. I chose to use colored pencils on mine because it was what I had on hand but you can use all sorts of things to draw on your shrink plastic: permanent markers, stamps, alcohol inks, or Copic markers.

I drew a few simple gems and traced a swallowtail butterfly from a coloring book.
Step 2. Color in your designs. Keep in mind that the colors will become more intense when you shrink your images.

I may have been a bit overzealous with the rainbow...in my defense, its been rather gray this january.
Step 3. Carefully cut out your images, rounding any sharp corners, and punch any necessary holes.

Step 4. Prepare to shrink your designs! My shrink plastic's instructions said to place the pieces colored side up on a baking paper lined sheet pan in a 325 degree F (or 163 C) oven, but your instructions may differ, so make sure to read them. Shrinking your charms is by far the most nerve wracking/exciting part of the process.


First the plastic will curl. If it looks like it might be stuck to itself pull it out of the oven and carefully unstick the warm piece. You must do this while the plastic is warm and flexible, if it gets too cold it will become brittle and snap.

If you like, you can seal your designs. (However, I would not recommend the spray I used-Kylon Acrylic Crystal Clear, it did not work very well and the pieces stunk for quite a while even after they had completely dried.)
Step 5. You can really use these charms for anything you can think of.
I chose to make a couple necklaces. Unfortunately, I didn't have any jump rings that matched my chain, instead I simply opened up the last link of my chain and used that to attach the charm to the necklace.


Lastly, a clasp, which luckily came with the chain I was using so I didn't have to go out and find one.


Subscribe to:
Comments (Atom)

-
 Photo by Wendy Hurst Fairy wings may not be the most practical of projects, but they're a lot of fun. Perfect for dress up, or a...
 -
 Not long ago I was going through some of my craft supplies, attempting to organize them, attempting being a key word here. While I was rum...
